If you store important, confidential information in the application notes on your iPhone, be careful.By default, the data from this application is synchronized with iCloud, i.e. available on the iPad and Mac, where you are logged in with your Apple ID.If you provide these equipment with family members or colleagues, you risk that your notes will be read, edited and deleted by other people.Fortunately, this can be easily remedied.
iCloud undoubtedly a very convenient way to synchronize the data between iUs.However, this ease and availability can sometimes cause problems.Regardless of whether in the application you store the sketches of business correspondence, keep a secret journal, whether you keep a collection of private photos are people who use your other gadgets with the Apple logo have easy access to them.However, the risk of loss of privacy or accidental data deletion can be dismissed.There are a few ways to do it.You can secure notes with a password or disable synchronization.Each method has its pros and cons, but you will definitely find a solution that will be the least burdensome for you and will effectively protect your notes.
Keep notes only on your iPhone
Maintaining notes only in the memory of the iPhone is the easiest solution and the least burdensome solution.The iOS system allows you to create a special local account notes in the application.All notes placed in folders on this account will not be synchronized with iCloud, and thus, they will not be available on your iPad or Mac.Since such an account is not as standard in the application application, you must reach for system settings to enable them.
To create a local account in the Notes application:
Open the Settings application, scroll the screen and touch the notes.Then move the slider to the right with the account option on my iPhone.

Note: If you have not logged in to iCloud during the configuration of the iPhone or so far you have not used synchronization with iCloud, the option on my iPhone is already enabled, and the account on my iPhone is the only one available in the application.
Now, when you open notes on the folder screen, you should see two accounts: iCloud and on my iPhone.From now on it depends only on you which notes will be synchronized with other iuations, and which are available only on the phone.You just have to remember to save secret notes on the iPhone account.
Remember: if you have a note on the iCloud account that you want to store locally on your iPhone, you can easily move it.All you have to.
Block the notes with a password
IOS from version 9.3 allows you to secure notes stored in the application notes using the password.The slogan can be both alphanumeric and biometric thanks to the Touch ID or Face ID, but in this unique case the use of biometrics is not always a good idea, which you can read a bit further.The slogan securing notes is a great solution when you want to maintain privacy, but you do not want to give up the convenience provided by synchronization of notes from iCloud.When a blocked note appears on an iPad or Mac, it cannot be opened or deleted without providing a password or biometric data.
Remember: securing notes using Touch ID or Face ID is pointless if other users have their biometric data on the device.For example, you added to the Touchid fingerprint of your wife or colleague so that they can use your ii.In such a situation, stop at setting the alphanumeric password and do not turn on the unlocking note with the help of biometrics.
To set the password for the application application:
Open the Settings application, screen rewrite down and touch the notes.Then touch the password.Enter the password and hint twice.If no one other than you has the configurated biometric data on your iPhone, you can turn on biometrics by moving the switch to the right at Touch ID or Face ID option.
To secure the note with the slogan:
Create a note and touch the icons with three dots visible in the upper right corner of the screen.From the menu, select Block.From that moment, to read or delete this note, you will have to enter the password.
Do not synchronize your notes from iCloud
Synchronization of data between devices using iCloud is an extremely convenient thing.However, not when some data such as notes, for example, you want to have only one device available.Fortunately, synchronization from iCloud can be turned off, not necessarily but everyone, and for selected applications.
Note: ICloud synchronization can be turned off on any device.For example, you can disable iCloud synchronization only on the iPhone or disable iCloud synchronization only on iPad or/or Mac.In each case, the iPhone notes will not be available on other devices.However, there is a catch here.Anyone who has access to other devices can re -enable iCloud synchronization without passing a password, so if you want to have a privacy guarantee, turn off the synchronization of the iPhone, not on the iPad or Mac, which is used by children or colleagues.
To disable the synchronization of notes from iCloud:
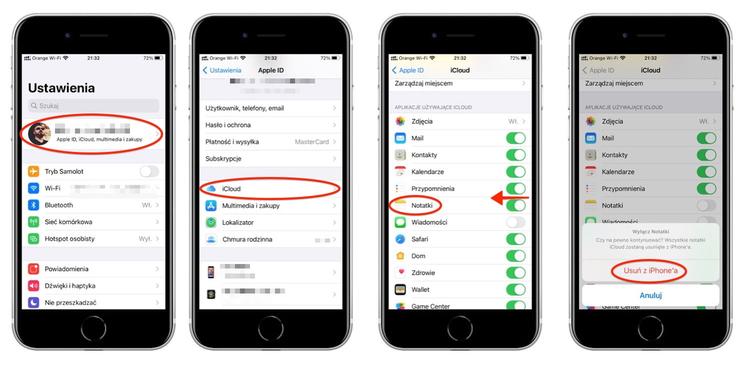
On the iPhone, run the Settings application, then click your business card visible in the upper part of the screen.Choose iCloud from the menu and move the slider to the left visible when applying notes.After displaying the prompt, click Delete from my iPhone.From that moment, synchronization from iCloud is turned off.
Note: only synchronization in iCloud removes all iCloud notes from the iPhone's memory, but a copy of your notes is still in iCloud.Therefore, before excluding synchronization, you should transfer important notes to my iPhone account (see advice first).
Remember: Although locally stored notes on the iPhone are not synchronized between devices, they are still saved in a backup in iCloud, when the backup function iCloud is enabled in the iCloud settings.If you are worried about security, turn off the backup in iCloud and use Mac to create backups of the iPhone, your notes will be saved in a encrypted backup on your computer.Data from the encrypted backup are clear only after restoring to the iPhone.


![Apps and games on iOS for free.Promotions, discounts, discounts [27.12.2021] Apps and games on iOS for free.Promotions, discounts, discounts [27.12.2021]](https://website-google-hk.oss-cn-hongkong.aliyuncs.com/article-website/google/2021/12/31/661e1a9d1bdfffaecac65b0350aa0db5.webp?x-oss-process=image/auto-orient,1/quality,q_70/format,jpeg)